Tutorial: Adding a command
Let’s walk you through the implementation of a new command — remark.
This command allows users of the AddressBook application to add optional remarks to people in their address book and edit it if required. The command should have the following format:
remark INDEX r/REMARK (e.g., remark 2 r/Likes baseball)
We’ll assume that you have already set up the development environment as outlined in the Developer’s Guide.
Create a new remark command
Looking in the logic.command package, you will notice that each existing command have their own class. All the commands inherit from the abstract class Command which means that they must override execute(). Each Command returns an instance of CommandResult upon success and CommandResult#feedbackToUser is printed to the ResultDisplay.
Let’s start by creating a new RemarkCommand class in the src/main/java/seedu/address/logic/command directory.
For now, let’s keep RemarkCommand as simple as possible and print some output. We accomplish that by returning a CommandResult with an accompanying message.
RemarkCommand.java:
package seedu.condonery.logic.commands;

import seedu.condonery.model.Model;

/**
 * Changes the remark of an existing person in the address book.
 */
public class RemarkCommand extends Command {

    public static final String COMMAND_WORD = "remark";

    @Override
    public CommandResult execute(Model model) {
        return new CommandResult("Hello from remark");
    }
}
Hook RemarkCommand into the application
Now that we have our RemarkCommand ready to be executed, we need to update AddressBookParser#parseCommand() to recognize the remark keyword. Add the new command to the switch block by creating a new case that returns a new instance of RemarkCommand.
You can refer to the changes in this diff.
Run the application
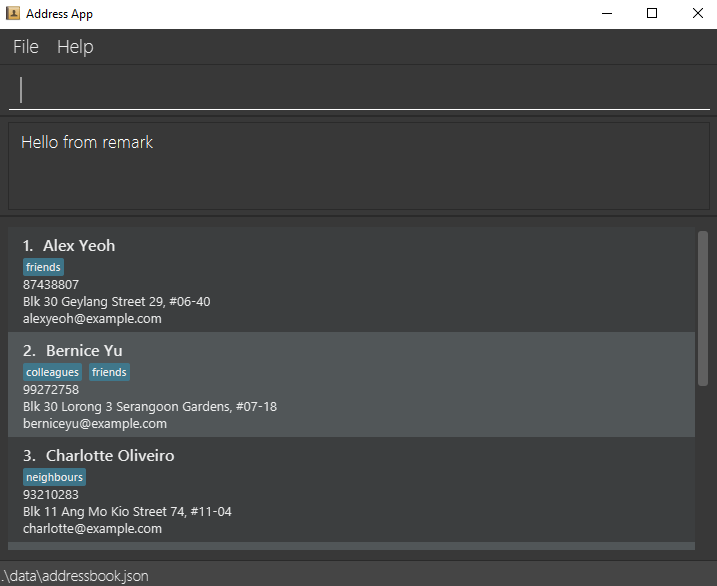
Run Main#main and try out your new RemarkCommand. If everything went well, you should see something like this:
Change RemarkCommand to throw an exception
While we have successfully printed a message to ResultDisplay, the command does not do what it is supposed to do. Let’s change the command to throw a CommandException to accurately reflect that our command is still a work in progress.
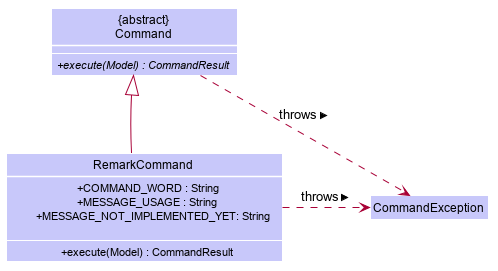
Following the convention in other commands, we add relevant messages as constants and use them.
RemarkCommand.java:
    public static final String MESSAGE_USAGE = COMMAND_WORD
            + ": Edits the remark of the person identified "
            + "by the index number used in the last person listing. "
            + "Existing remark will be overwritten by the input.\n"
            + "Parameters: INDEX (must be a positive integer) "
            + "r/ [REMARK]\n"
            + "Example: " + COMMAND_WORD + " 1 "
            + "r/ Likes to swim.";

    public static final String MESSAGE_NOT_IMPLEMENTED_YET =
            "Remark command not implemented yet";

    @Override
    public CommandResult execute(Model model) throws CommandException {
        throw new CommandException(MESSAGE_NOT_IMPLEMENTED_YET);
    }
Enhancing RemarkCommand
Let’s change RemarkCommand to parse input from the user.
Make the command accept parameters
We start by modifying the constructor of RemarkCommand to accept an Index and a String. While we are at it, let’s change the error message to echo the values. While this is not a replacement for tests, it is an obvious way to tell if our code is functioning as intended.
import static seedu.condonery.commons.util.CollectionUtil.requireAllNonNull;
//...
public class RemarkCommand extends Command {
    //...
    public static final String MESSAGE_ARGUMENTS = "Index: %1$d, Remark: %2$s";

    private final Index index;
    private final String remark;

    /**
     * @param index of the person in the filtered person list to edit the remark
     * @param remark of the person to be updated to
     */
    public RemarkCommand(Index index, String remark) {
        requireAllNonNull(index, remark);

        this.index = index;
        this.remark = remark;
    }
    @Override
    public CommandResult execute(Model model) throws CommandException {
        throw new CommandException(
                String.format(MESSAGE_ARGUMENTS, index.getOneBased(), remark));
    }

    @Override
    public boolean equals(Object other) {
        // short circuit if same object
        if (other == this) {
            return true;
        }

        // instanceof handles nulls
        if (!(other instanceof RemarkCommand)) {
            return false;
        }

        // state check
        RemarkCommand e = (RemarkCommand) other;
        return index.equals(e.index)
                && remark.equals(e.remark);
    }
}
Your code should look something like this after you are done.
Parse user input
Now let’s move on to writing a parser that will extract the index and remark from the input provided by the user.
Create a RemarkCommandParser class in the seedu.condonery.logic.parser package. The class must extend the Parser interface.
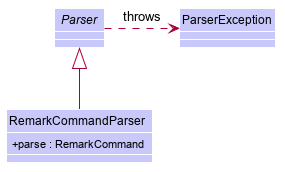
Thankfully, ArgumentTokenizer#tokenize() makes it trivial to parse user input. Let’s take a look at the JavaDoc provided for the function to understand what it does.
ArgumentTokenizer.java:
/**
 * Tokenizes an arguments string and returns an {@code ArgumentMultimap}
 * object that maps prefixes to their respective argument values. Only the
 * given prefixes will be recognized in the arguments string.
 *
 * @param argsString Arguments string of the form:
 * {@code preamble <prefix>value <prefix>value ...}
 * @param prefixes   Prefixes to tokenize the arguments string with
 * @return           ArgumentMultimap object that maps prefixes to their
 * arguments
 */
We can tell ArgumentTokenizer#tokenize() to look out for our new prefix r/ and it will return us an instance of ArgumentMultimap. Now let’s find out what we need to do in order to obtain the Index and String that we need. Let’s look through ArgumentMultimap :
ArgumentMultimap.java:
/**
 * Returns the last value of {@code prefix}.
 */
public Optional<String> getValue(Prefix prefix) {
    List<String> values = getAllValues(prefix);
    return values.isEmpty() ? Optional.empty() :
        Optional.of(values.get(values.size() - 1));
}
This appears to be what we need to get a String of the remark. But what about the Index? Let’s take a quick peek at existing Command that uses an index to see how it is done.
DeleteCommandParser.java:
Index index = ParserUtil.parseIndex(args);
return new DeleteCommand(index);
There appears to be another utility class that obtains an Index from the input provided by the user.
Now that we have the know-how to extract the data that we need from the user’s input, we can parse the user command and create a new instance of RemarkCommand, as given below.
RemarkCommandParser.java:
public RemarkCommand parse(String args) throws ParseException {
    requireNonNull(args);
    ArgumentMultimap argMultimap = ArgumentTokenizer.tokenize(args,
        PREFIX_REMARK);

    Index index;
    try {
        index = ParserUtil.parseIndex(argMultimap.getPreamble());
    } catch (IllegalValueException ive) {
        throw new ParseException(String.format(MESSAGE_INVALID_COMMAND_FORMAT,
            RemarkCommand.MESSAGE_USAGE), ive);
    }

    String remark = argMultimap.getValue(PREFIX_REMARK).orElse("");

    return new RemarkCommand(index, remark);
}
AddressBookParser to use our new RemarkCommandParser!
If you are stuck, check out the sample here.
Add Remark to the model
Now that we have all the information that we need, let’s lay the groundwork for propagating the remarks added into the in-memory storage of person data. We achieve that by working with the Person model. Each field in a Person is implemented as a separate class (e.g. a Name object represents the person’s name). That means we should add a Remark class so that we can use a Remark object to represent a remark given to a person.
Add a new Remark class
Create a new Remark in seedu.condonery.model.person. Since a Remark is a field that is similar to Address, we can reuse a significant bit of code.
A copy-paste and search-replace later, you should have something like this. Note how Remark has no constrains and thus does not require input
validation.
Make use of Remark
Let’s change RemarkCommand and RemarkCommandParser to use the new Remark class instead of plain String. These should be relatively simple changes.
Add a placeholder element for remark to the UI
Without getting too deep into fxml, let’s go on a 5 minute adventure to get some placeholder text to show up for each person.
Simply add the following to seedu.condonery.ui.PersonCard.
PersonCard.java:
@FXML
private Label remark;
@FXML is an annotation that marks a private or protected field and makes it accessible to FXML. It might sound like Greek to you right now, don’t worry — we will get back to it later.
Then insert the following into main/resources/view/PersonListCard.fxml.
PersonListCard.fxml:
<Label fx:id="remark" styleClass="cell_small_label" text="\$remark" />
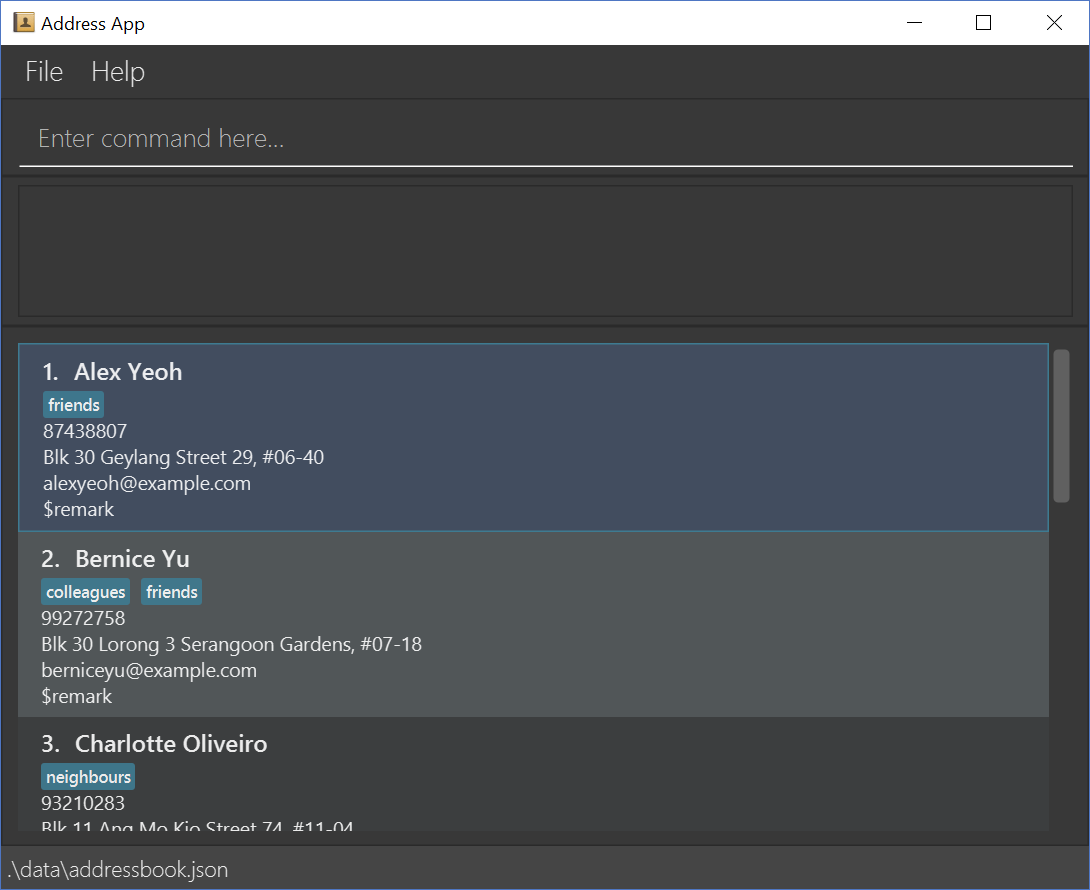
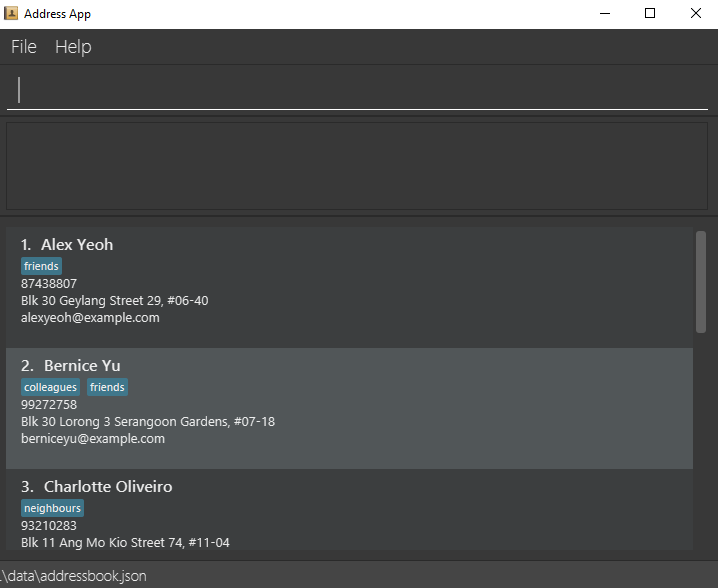
That’s it! Fire up the application again and you should see something like this:
Modify Person to support a Remark field
Since PersonCard displays data from a Person, we need to update Person to get our Remark displayed!
Modify Person
We change the constructor of Person to take a Remark. We will also need to define new fields and accessors accordingly to store our new addition.
Update other usages of Person
Unfortunately, a change to Person will cause other commands to break, you will have to modify these commands to use the updated Person!
Find Usages feature in IntelliJ IDEA on the Person class to find these commands.
Refer to this commit and check that you have got everything in order!
Updating Storage
AddressBook stores data by serializing JsonAdaptedPerson into json with the help of an external library — Jackson. Let’s update JsonAdaptedPerson to work with our new Person!
While the changes to code may be minimal, the test data will have to be updated as well.
/data/addressbook.json before running it! Not doing so will cause AddressBook to default to an empty address book!
Check out this commit to see what the changes entail.
Finalizing the UI
Now that we have finalized the Person class and its dependencies, we can now bind the Remark field to the UI.
Just add this one line of code!
PersonCard.java:
public PersonCard(Person person, int displayedIndex) {
    //...
    remark.setText(person.getRemark().value);
}
Putting everything together
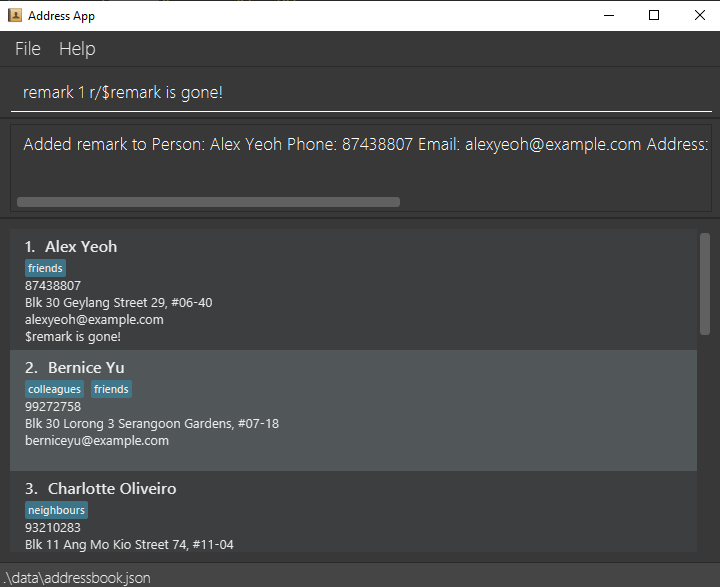
After the previous step, we notice a peculiar regression — we went from displaying something to nothing at all. However, this is expected behavior as we are yet to update the RemarkCommand to make use of the code we’ve been adding in the last few steps.
Update RemarkCommand and RemarkCommandParser
In this last step, we modify RemarkCommand#execute() to change the Remark of a Person. Since all fields in a Person are immutable, we create a new instance of a Person with the values that we want and
save it with Model#setPerson().
RemarkCommand.java:
//...
    public static final String MESSAGE_ADD_REMARK_SUCCESS = "Added remark to Person: %1$s";
    public static final String MESSAGE_DELETE_REMARK_SUCCESS = "Removed remark from Person: %1$s";
//...
    @Override
    public CommandResult execute(Model model) throws CommandException {
        List<Person> lastShownList = model.getFilteredPersonList();

        if (index.getZeroBased() >= lastShownList.size()) {
            throw new CommandException(Messages.MESSAGE_INVALID_PERSON_DISPLAYED_INDEX);
        }

        Person personToEdit = lastShownList.get(index.getZeroBased());
        Person editedPerson = new Person(
                personToEdit.getName(), personToEdit.getPhone(), personToEdit.getEmail(),
                personToEdit.getAddress(), remark, personToEdit.getTags());

        model.setPerson(personToEdit, editedPerson);
        model.updateFilteredPersonList(PREDICATE_SHOW_ALL_PERSONS);

        return new CommandResult(generateSuccessMessage(editedPerson));
    }

    /**
     * Generates a command execution success message based on whether
     * the remark is added to or removed from
     * {@code personToEdit}.
     */
    private String generateSuccessMessage(Person personToEdit) {
        String message = !remark.value.isEmpty() ? MESSAGE_ADD_REMARK_SUCCESS : MESSAGE_DELETE_REMARK_SUCCESS;
        return String.format(message, personToEdit);
    }
Writing tests
Tests are crucial to ensuring that bugs don’t slip into the codebase unnoticed. This is especially true for large code bases where a change might lead to unintended behavior.
Let’s verify the correctness of our code by writing some tests!
Of course you can simply add the test cases manually, like you’ve been doing all along this tutorial. The result would be like the test cases in here. Alternatively, you can get the help of IntelliJ to generate the skeletons of the test cases, as explained in the next section.
Automatically generating tests
The goal is to write effective and efficient tests to ensure that RemarkCommand#execute() behaves as expected.
The convention for test names is methodName_testScenario_expectedResult. An example would be
execute_filteredList_success.
Let’s create a test for RemarkCommand#execute() to test that adding a remark works. On IntelliJ IDEA you can bring up the context menu and choose to Go To > Test or use the appropriate keyboard shortcut.

Then, create a test for the execute method.
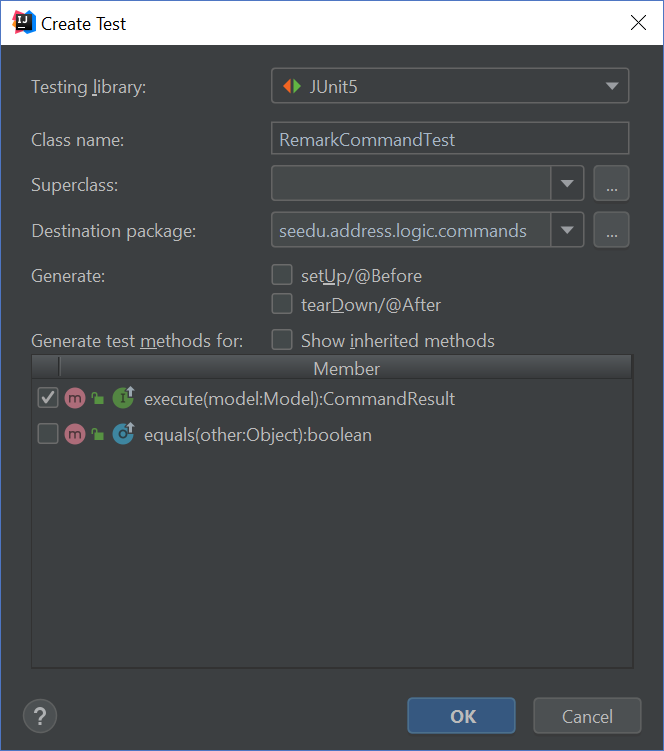
Following convention, let’s change the name of the generated method to execute_addRemarkUnfilteredList_success.
Let’s use the utility functions provided in CommandTestUtil. The functions ensure that commands produce the expected CommandResult and output the correct message. In this case, CommandTestUtil#assertCommandSuccess is the best fit as we are testing that a RemarkCommand will successfully add a Remark.
You should end up with a test that looks something like this.
Conclusion
This concludes the tutorial for adding a new Command to AddressBook.